Use code DOCOS10 for 10% off your first order Shop Now

Bezplatna dostawa dla wszystkich zamówień Kup teraz

30-DNIOWE ZWROTY | CERTYFIKACJA ETL | WSPARCIE 24/7

Nie znaleziono wyników

Spróbuj innego terminu wyszukiwania lub przeglądaj według kategorii

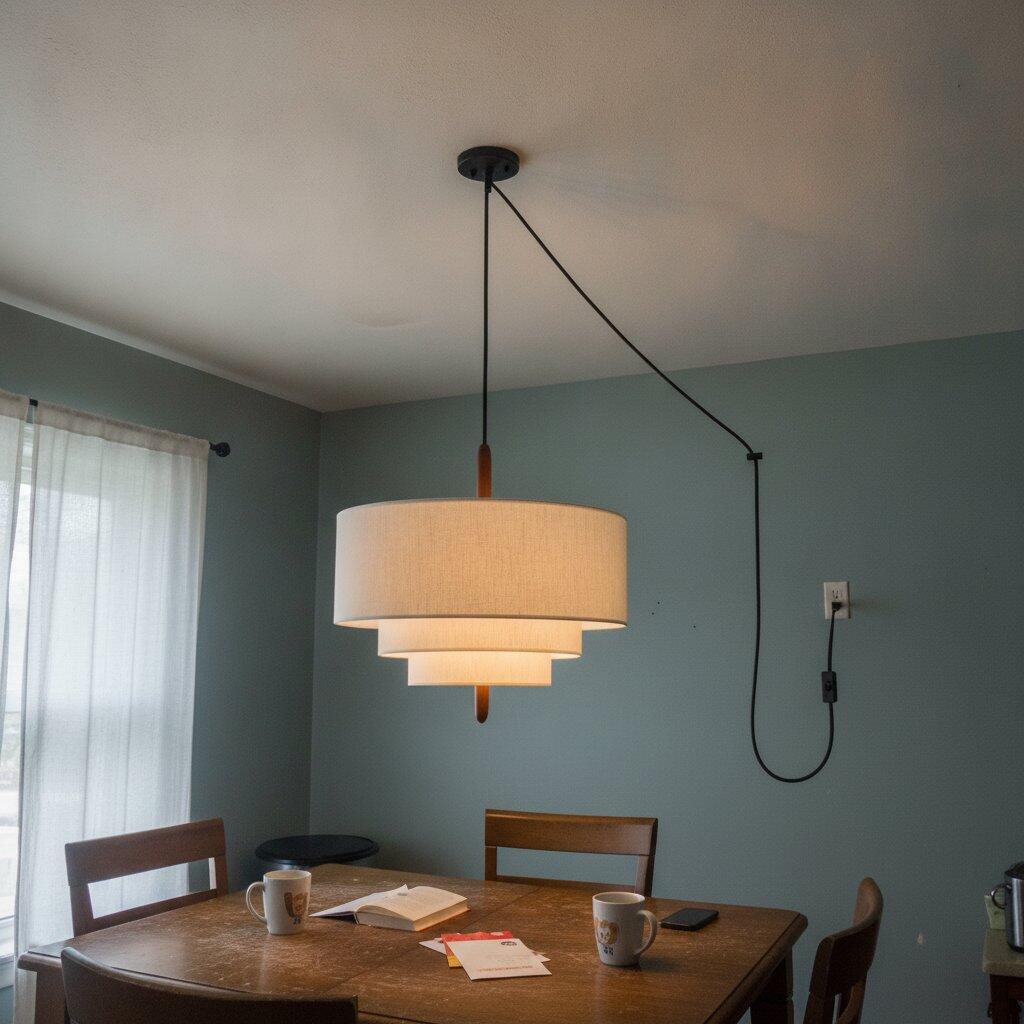
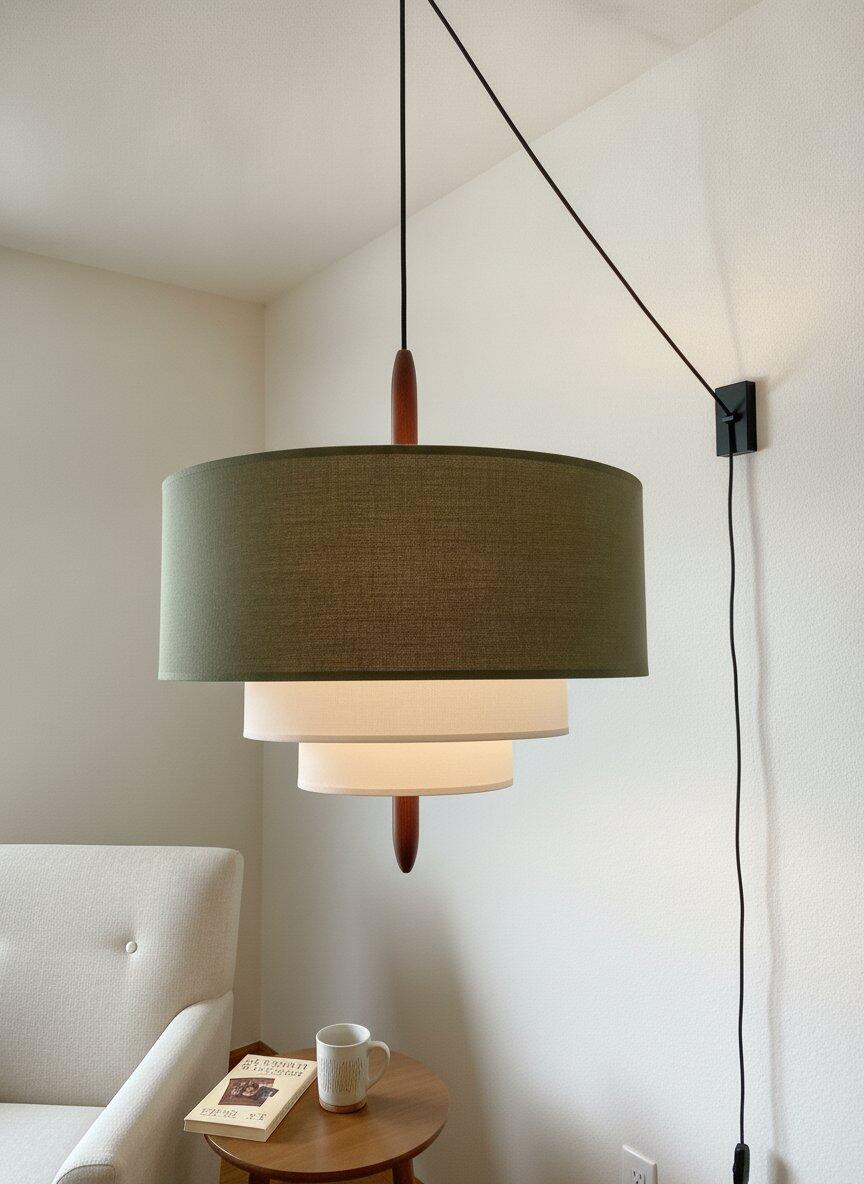
Lampa wisząca Raphia Plug In

DCP-C1026-01

£212.00 GBP £302.00 GBP

| /

Inspiracja

Raphia powstała z piosa próbek abażurów pozostawionych na stole warsztatowym, największa na dole, każda kolejna nieco węższa. Postrzegana jako całość stos miał rytm, który żaden pojedynczy abażur nie mógł oddać — dlatego go zachowano: trzy lub pięć tkaninowych bubnów opadających do wewnątrz, nawleczone na obracany drewniany pręt biegnący przez całą wysokość. Światło opuszcza każdy poziom pod inną średnicą, dlatego blask warstwuje się zamiast pojawiać się naraz.

Cechy charakterystyczne

Warstwowe abażury tkaninowe
Tkaninowe bubny o malejących średnicach na metalowej ramie, nawleczone na obracany drewniany pręt — światło przychodzi warstwami zamiast jednym płaskim strumieniem.
Wtyczka swag, brak instalacji
Wisi na haku sufitowym na przewodzie długości 177″ z wyłącznikiem wbudowanym i standardową wtyczką — sięga miejsc, do których nie dotrze puszka stykowa.
Trzy lub pięć głowic
Dwa rozmiary w kolorze Beż lub Zielony, z żarówkami dla każdego gniazda — trzy dla mniejszego rozmiaru, pięć dla większego.
Rozmiar i dopasowanie

Konfiguracja Wymiary Najlepsze do
3 głowice Ø 17.7″ × H 11″ (45 × 28 cm) Sypialnia, przedpokój, kąt do czytania, stół na cztery osoby
5 głowic Ø 22.8″ × H 14.1″ (58 × 36 cm) Stół jadalny na sześć osób, salon, większa otwarta przestrzeń
Specyfikacja

Typ Oprawy
Wisząca lampa swag na wtyczkę · warstwowy abażur puchowy · trzy lub pięć głowic
Materiały i Wykończenie
Rama metalowa, warstwowe abażury tkaninowe, obracany drewniany pręt centralny · Beż (oatmeal na całej powierzchni) lub Zielony (zielona górna warstwa nad kremowymi warstwami dolnymi)
Źródło Światła
3 × E26 lub E27 (3-głowicowa) lub 5 × E26 lub E27 (5-głowicowa) gniazda śrubowe · ciepłe białe żarówki 3000K dołączone do każdego gniazda
Przewód i włącznik
Przewód 177″ / 450 cm · wtyczka standardowa · wyłącznik wbudowany w przewód
Montaż
Swag na wtyczkę wiszący na haku sufitowym — hak nie wchodzi w skład zestawu, użyj haka przystosowanego do ciężaru lampy · brak instalacji przewodowej lub wymaganych puszek stykowych
Wysokość zawieszenia
Dno abażura 30–36″ / 76–91 cm nad stołem jadalnym
Zasilanie
Wtyka się do standardowego gniazdka ściennego · AC 110–240V
Ocena
Tylko do pomieszczeń wewnętrznych w suchych lokalizacjach
Pielęgnacja
Odkurz tkaninowe warstwy miękką szczoteczką; wytrzej drewno i metal miękką suchą szmatką. Unikaj wilgoci i ostrych czyszczących środków.
Certyfikowane
Ameryka Północna · Australia · Europa · Bliski Wschód
Styl Projektowania
Mid-Century Nowoczesny Skandynawski Japandi Przejściowy
FAQ

Jaki hak potrzebuję i jak poprowadzić przewód?
Użyj haka sufitowego przystosowanego na znacznie większy ciężar niż waga lampy, zamocowanego w belce lub z odpowiednim kotwem do pustych ścian — hak tylko do gipsu się wysypie. Umieść pierwszy hak w miejscu, gdzie ma wisieć abażur, następnie użyj drugiego haka blisko ściany, aby zmienić kierunek przewodu i zmniejszyć napięcie. Stąd przewód spada do gniazda, a nadmiar można ułożyć za meblami zamiast ciąć.
Trzy czy pięć głowic?
Kieruj się powierzchnią poniżej i potrzebnym światłem. Wersja 3-głowicowa sprawdza się w sypialni, przedpokoju, kącie do czytania lub przy stole na cztery osoby; wersja 5-głowicowa jest prawie 5″ szersza i wyższa, z dwoma dodatkowymi gniazdami, dlatego nadaje się do stołu na sześć osób lub salonu, gdzie to główne źródło światła. W małym pomieszczeniu wersja 5-głowicowa może wyglądać ciężko.
Czy przewód można skrócić?
Przewód 177″ jest przeznaczony do ułożenia swag, a nie do cięcia — jest długi, żeby lampa mogła wisieć z dala od gniazda. Zbierz slack za pomocą haków lub klipa na przewód, albo zwiń nadmiar za półką lub sofą. Cięcie i ponowne podłączenie wtyczki to praca elektryk i nie jest objęta gwarancją.
Do pobrania

Odnośnik techniczny do wiszące lampy Raphia na wtyczkę. Potrzebujesz dokumentu, który nie jest wymieniony? Wyślij wiadomość na adres info@docos.us.

Plug-In Lighting Series

Beautiful light.No electrician required.

Our complete plug-in collection—pendants and wall sconces—designed for renters, dorms, and anyone whose dream home wasn't built with the lights in the right place. Hang it. Plug it in. Done in five minutes.

Brooklyn Rental Plug-in pendant in apartment
5 min Setup
From box to glow
2 styles Pendants
& Wall sconces
$0 Electrician
Required
100% Renter
Friendly
Two Forms · One Idea

Choose the way
your room asks for.

Hang it from above, mount it on the wall—both versions plug into any standard outlet, both install in five minutes, both work in any rental. Pick the geometry that fits your space.

Type 01 Pendant Plug-in pendant lamp

The Plug-In Pendant.

Hangs from the ceiling on a 1.8-meter cord. Drape, swag, or drop straight down—then plug into any wall outlet. Perfect over beds, dining tables, reading chairs, or kitchen islands.

Cord1.8 m
MountCeiling hook
Best forAbove surfaces
Setup5 min
Type 02 Sconce Plug-in wall sconce

The Plug-In Wall Sconce.

Mounts directly to any wall with the included adhesive plate or removable hook—no drilling, no electrician. Perfect beside beds, sofas, hallways, or stairwells where overhead lighting won't reach.

Cord2.0 m
MountAdhesive plate
Best forBeside surfaces
Setup5 min
— The Idea

Most lighting needs permission slips, electricians, and a landlord's blessing.
That's not lighting—that's bureaucracy.

The plug-in series exists because beautiful light shouldn't depend on whether your apartment came with the right ceiling box—or whether you own the apartment at all. Every pendant and sconce in the line plugs straight into any outlet.

The Diagnosis

Why traditional fixtures fail real homes.

Three blockers we see across thousands of customer messages—and the reason this whole series exists. Pendants and sconces, both designed to skip every one of these.

i
The lease says no.
Most rental agreements forbid permanent fixture changes—no drilling, no rewiring, nothing that risks your security deposit.
~100%of renters affected
ii
The wiring is in the wrong spot.
Your overhead box hangs above a doorway. Your wall has no junction box at all. Light never lands where you actually need it.
~74%of apartments
iii
Hiring help feels excessive.
Hundreds of dollars and a half-day appointment, just to add one fixture to one room. The math rarely makes sense.
$240+avg quote
The Solution

Designed to just work,
wherever you live.

Every pendant and every sconce in the series ships with everything you need to skip the electrician—and nothing you don't.

— i
Renter-friendly by design

No drilling, no rewiring. Every component comes off cleanly when you move out.

— ii
Extra-long cord (1.8m / 2.0m)

Fabric-wrapped, drape-able. Reach almost any spot from any wall outlet.

— iii
Tool-free install kit

Ceiling hooks, adhesive plates, removable mounts—all included. No drill, no studs to find.

— iv
Inline switch + dimmable

Click on, click off. Works with smart bulbs, warm-dim LEDs, and standard incandescent.

Wall Sconce · Bedside Plug-in wall sconce beside bed
Cord Freedom

Cords as long as
your imagination.

Stop letting your home's wiring dictate where things go. Drape across the ceiling. Swag through a hook. Mount a sconce anywhere on the wall. The cord becomes part of the design, not something to hide.

From any outlet to almost any spot in the room—pendants reach across, sconces reach beside. Pick the geometry your room asks for.

1.8 m
Pendant cord
Drape · Swag · Drop
2.0 m
Sconce cord
Wall to outlet
360°
Sconce arm
Adjustable reach
From Box to Glow

Three steps. Five minutes.
Zero tools.

If you can hang a picture frame, you can install any fixture in this series. Pendant or sconce—same five-minute process, same zero electricians.

01
— Minute 1

Mount the hook or plate

For pendants: use the included ceiling hook or adhesive ceiling mount. For sconces: peel and stick the included wall plate—or use a removable wall hook. No drill, no anchors, no commitment.

02
— Minutes 2–3

Hang & route the cord

Hang the pendant from the hook, or click the sconce onto the wall plate. Route the cord along the ceiling, wall, or beam to the nearest outlet—whichever path looks best.

03
— Minutes 4–5

Plug in & glow

Connect to any standard wall outlet, flick the inline switch, and step back. Your space is transformed—and you didn't drill a single hole.

In Real Homes

Pendants above.
Sconces beside. Light everywhere.

From bedside to kitchen island, hallway to reading nook—see how the plug-in series transforms spaces traditional fixtures can't reach.

— 01 Pendant Bedside pendant
Bedroom · Above

Hung over the bed.

Warm glow on either side—no nightstands, no drilling.

— 02 Sconce Wall sconce in living room
Living Room · Beside

Mounted on the wall.

Sculptural form, soft pool of light by the sofa.

— 03 Pendant Kitchen pendant
Kitchen · Above

Over the prep zone.

Real task light where rental kitchens are darkest.

— 04 Sconce Hallway sconce
Hallway · Beside

Down the hall.

Warm sconce light where overhead never reaches.

"
★ ★ ★ ★ ★
Jordan K.Verified Buyer
Austin, TX · Renter, 8 yrs
I bought a pendant for the bedroom and a pair of sconces for the living room. Eight years of renting and finally real lighting—no drilling, no asking my landlord, no hiring anyone. I genuinely teared up.

Beautiful lighting,finally for everyone.

Pendants, sconces, and everything in between—designed to plug into any outlet, install in five minutes, and move with you when the lease ends.

Shop the Series →

Why We Love It

Premium LED Technology

Energy-efficient LEDs deliver a brighter, longer-lasting glow with none of the upkeep of traditional bulbs.

Free & Fast Shipping

Every order ships free with express delivery, no minimums and no hidden fees.

30-Day Hassle-Free Returns

Not the right fit? Send it back within 30 days for a full refund, no questions asked.